0.00  0

Cart

No products in the cart.

Continue shopping

Surface Alchemy: How Destruction Techniques Can Unlock Your Creativity

1. Surface Alchemy: The Art of Creative Destruction

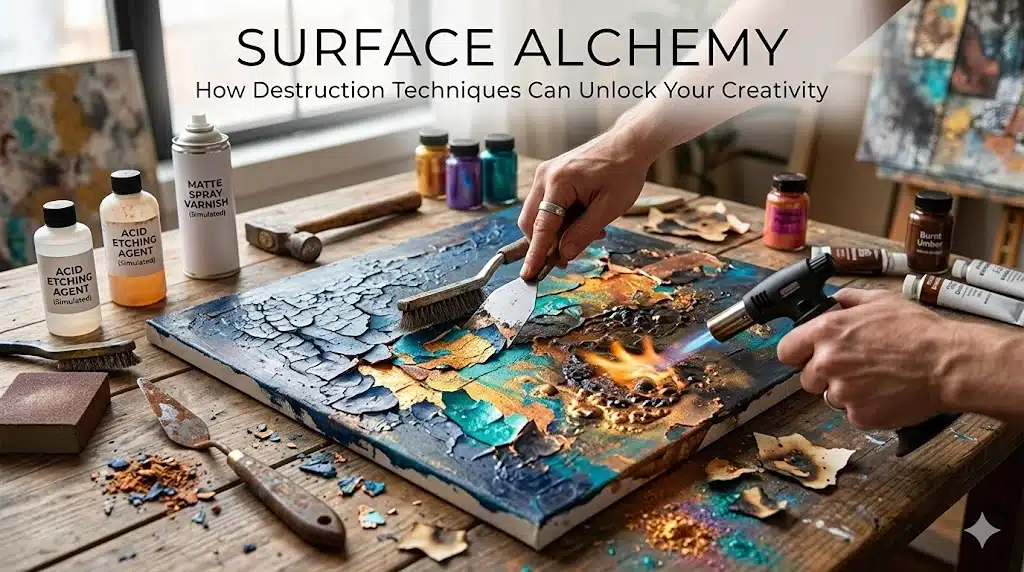
Most of us are taught to be careful with our paintings: protect the surface, avoid “ruining” it, and treat every mark like it might be the final one. That mindset can be useful for craft—but it can also kill experimentation and feed perfectionism.

Surface Alchemy flips that script. Instead of guarding the surface, you treat it as something you’re allowed to attack, erode, and rebuild. You use non‑traditional tools—sandpaper, wire brushes, scrapers, blades—to reveal history, create texture, and break through artist’s block.

In this approach, “destruction” isn’t vandalism; it’s a deliberate stage in your process. You sand back layers to let earlier colors peek through. You distress gesso so the canvas never feels too pristine. You scrape into wet or dry paint to cut new shapes and let older layers shine.

The result is not just a more complex surface, but a more fearless mindset.

2. Why Destruction Belongs in a Creative Process

Destructive techniques help at three levels: psychological, visual, and technical.

2.1. Killing the fear of the “perfect white” surface

A blank, perfectly white canvas or panel can feel sacred. One wrong mark and it’s “ruined.” For many artists, that pressure is paralyzing.

By distressing the surface before you even begin, you deliberately remove that sense of perfection. For example:

  • Scratch into wet gesso with a comb or brush end.
  • Sand a primed surface so some areas are smooth and others rough.
  • Stain the ground with random diluted color rather than leaving it white.

The moment there’s already a “flaw,” you’re free. You’re no longer trying to protect something perfect; you’re building on something lived‑in. That simple shift can be the difference between staring at a blank panel for an hour and making your first confident marks.

2.2. Creating complexity no brush can fake

When you sand a multi‑layered painting or scrape into thick passages, you get effects that are almost impossible to fake with a brush:

  • Broken color: small specks of underlying hues appear in unexpected places.
  • Ghosted edges: instead of hard outlines, you get transitional bands where color fades and mixes optically.
  • History lines: scratches, scuffs, and worn‑back zones hint at previous decisions.

You’re essentially painting in reverse: instead of only adding, you subtract to reveal. That interplay between addition and removal instantly makes a painting feel deeper and more layered.

2.3. Breaking attachment to bad decisions

We all know the feeling of clinging to a passage that isn’t working because we’re attached to the time we already spent on it. Destructive tools cut through that attachment.

When you know you can sand, scrape, or obliterate any part of the painting and still move forward, you stop treating imperfect decisions as precious. Teachers who use sandpaper techniques describe it as removing “loyalty to previous mistakes” and creating a better foundation for the next layer.

That mindset—“nothing is final; everything is workable”—is one of the most reliable cures for artist’s block.

3. The Core Tools of Surface Alchemy

You don’t need exotic supplies. The essential tools are things that abrade, scratch, or slice.

3.1. Sandpaper: from soft ghosting to heavy distress

Sandpaper is the most versatile “destruction” tool in painting. Artists use it to:

  • Knock back overworked areas.
  • Reveal underlying colors and texture.
  • Create smooth, velvety transitions and soften edges.

Different grits give different levels of aggression:

Grit TypeEffect
Coarse (80–150 grit)Strong removal, deep scuffing. Good for heavy distress or taking off thicker paint on panels. Use carefully; it’s easy to go too far.
Medium (180–220 grit)Ideal for knocking down texture, smoothing gesso, and gently revealing underlayers. Great starting point for most surface work.
Fine (320–400+ grit)For subtle smoothing, ghosting, and polishing. Useful at the end of a process for very delicate adjustments.

Tips:

  • Wrap sandpaper around a flat block for even pressure and to avoid gouging.
  • Always sand fully dry paint or gesso to avoid gummy smears.
  • Wear a dust mask, especially when sanding acrylic, oil, or any primed surface.

3.2. Wire brushes: controlled chaos in line form

Wire brushes add more directional energy than plain sandpaper. Guides on advanced acrylic texture note that wire brushes can:

  • Drag broken lines through wet or semi‑dry paint to mimic grasses, bark, and weathered surfaces.
  • Scratch into dried layers to reveal color beneath in linear, organic patterns.
  • Build layered textures by alternating lighter and darker paint and lightly brushing over peaks.

They’re especially useful for:

  • Abstract marks that still feel natural.
  • Landscapes and organic textures where a little wildness is desirable.

Start with softer, finer bristles and light pressure; you can always escalate if you want more aggression.

3.3. Scrapers and blades: carving and erasing

Palette knives, paint scrapers, and razor blades let you remove paint in larger swathes or carve sharp edges into thick passages.

Uses:

  • Scraping back a whole area that isn’t working, leaving ghost shapes and stains as a base for something new.
  • Creating crisp, graphic marks by pulling a loaded knife across peaks and ridges.
  • Carving lines into thick paint or textured gesso that will catch or resist subsequent layers.

Always:

  • Work on rigid supports (wood panels, boards) if you’re scraping aggressively.
  • Be cautious on stretched canvas to avoid cutting fibers.
  • Use sharp tools responsibly—dull blades require more pressure and are actually more dangerous.

4. Distressing Gesso: Starting with a Surface That Has a Story

Instead of treating gesso as a neutral, invisible base, you can use it as the first layer of texture and history.

4.1. Why distress gesso?

  • It breaks the preciousness of the white ground.
  • It gives your paint something interesting to catch on or skip over.
  • It creates subtle directional cues that can influence composition and mark‑making.

4.2. Techniques for distressed gesso

Based on primers and gesso prep advice:

4.2.1. Cross‑hatched gesso layers

  • Apply your first coat of gesso with horizontal brush strokes.
  • Second coat vertically.
  • Third coat diagonally.
  • Don’t sand them perfectly flat; leave some ridges.

This creates a faint, woven texture that interacts beautifully with dry‑brush and glazes.

4.2.2. Selective sanding

  • After several coats of gesso are dry, sand some areas more than others.
  • You might fully smooth the central focal area and leave the edges rough, or vice versa.
  • Use 220–400 grit for control.

The variation in tooth affects how paint lays down and can introduce subtle vignettes.

4.2.3. Scoring into wet gesso

While a coat of gesso is still damp (not dripping, but not fully set), drag:

  • A comb
  • The end of a brush
  • A piece of cloth or sponge

Through the surface. Let it dry and gesso lightly over it if you want the texture more subtle.

The goal is to walk up to your canvas or panel and feel like it already has a personality—something you’re collaborating with, not a blank test.

5. Sanding Back Layers: Revealing the Painting’s History

Once you’ve started painting, sanding back becomes a way to let the memory of earlier choices show through.

5.1. How sanding interacts with layered paint

When you build multiple layers—glazes, opaque passes, scumbles—and then sand, you get:

  • Lightly exposed underlayers at peaks and edges.
  • A sense of age or patina, even in relatively new work.
  • Complex color where small fragments of different hues coexist in the same area.

Artists using sandpaper in oil pastels and painting talk about its ability to blend, soften, and reveal simultaneously—removing pigment while creating new transitions that feel more organic than brush blending.

5.2. Practical sanding strategies

5.2.1. Spot sanding for interest

Target one area that feels too flat or overworked (e.g., a background) and gently sand to bring back underlying texture. This prevents the entire painting from becoming uniformly noisy.

5.2.2. Sanding for edge control

If a hard edge feels too harsh, a few light sanding strokes can produce a beautiful, feathered transition. This is especially effective on rigid supports where you can control pressure.

5.2.3. Full‑surface “knock‑back”

For paintings that feel too slick, a very light, overall sanding with fine grit can unify sheen and give the whole surface a velvety feel. You can then glaze or repaint over this slightly roughened surface with better control.

Always sand in good light and stop frequently; it’s easy to get absorbed and suddenly realize you’ve gone further than you intended.

6. Wire Brushes and Scraping: Injecting Raw Energy

While sandpaper tends to soften and blend, wire brushes and scrapers add controlled violence.

6.1. Wire brush techniques that go beyond “damage”

Advanced acrylic texture resources describe several approaches:

6.1.1. Dry dragging in wet paint

  • Paint a fresh layer.
  • Immediately drag a (clean) wire brush in one direction.
  • This creates striations that can read as hair, grass, rain, or just abstract energy.

6.1.2. Scratching in semi‑dry paint

  • Wait until the paint has started to set but isn’t rock hard.
  • Use a wire brush to scratch passages that reveal undercolor without completely stripping the top.

This gives a weathered, time‑worn look.

6.1.3. Layering light over dark

  • Apply a darker underlayer.
  • Once dry, add a lighter layer.
  • When that’s partially dry, lightly wire‑brush to reveal dark streaks beneath, creating dimension.

You can also use wire brushes to blend edges while maintaining texture: light, multi‑directional strokes soften boundaries without turning everything into mush.

6.2. Scrapers: carving into thick paint

Palette knives and scrapers excel when you work with thicker paint or texture mediums:

  • Scrape down a thick field to expose the underpainting, leaving ridges and trenches.
  • “Shave” peaks off textures, then glaze over them to emphasize relief.
  • Create sharp, graphic diagonals that cut through more organic shapes.

Scraping is often a “big move” tool; it’s less about subtlety and more about bold redefinition. That’s precisely what makes it powerful when you’re stuck.

7. A Surface Alchemy Ritual for Beating Artist’s Block

Here’s a simple, repeatable exercise you can use when you feel blocked.

7.1. Step 1: Choose a piece you’re willing to sacrifice

Pick:

  • An old painting you dislike.
  • A failed experiment.
  • A panel with a boring or muddy underpainting.

The key is that you’re truly willing to destroy it if needed. That gives you psychological freedom.

7.2. Step 2: Attack the surface

Using your destructive tools:

  • Sand sections vigorously, exposing earlier color or even down to gesso in places.
  • Scratch through with a wire brush, especially in areas that feel too safe.
  • Scrape off thick areas with a knife or blade, creating raw edges and ghosts of forms.

This is not about “fixing” yet; it’s about breaking up what’s there and generating new information.

7.3. Step 3: Respond to what appears

Now step back and look for:

  • Interesting shapes created by sanded edges or exposed color.
  • Lines that could become branches, figures, horizon lines.
  • Color relationships you didn’t consciously plan.

Then:

  • Reinforce what you like with fresh paint or glazes.
  • Knock back what’s distracting.
  • Alternate between adding and subtracting until the piece starts telling you what it wants to be.

Because the painting has already been “ruined,” your nervous system relaxes. The stakes feel lower, and genuine play can return.

8. Safety, Materials, and Support Choices

Destruction techniques come with some practical constraints.

8.1. Support choice

  • Rigid supports (wood panels, hardboard, aluminum composite): Best for aggressive sanding, scraping, and wire‑brushing. Less risk of tearing or stretching.
  • Stretched canvas: Fine for light sanding and gentle distressing. Avoid deep scraping or hard wire brushing that can damage the fabric.

If you love heavy Surface Alchemy, consider working primarily on panels or canvas mounted to board.

8.2. Dust and debris

  • Always wear a dust mask when sanding gesso, acrylic, or oil paint; dried particles are not safe to inhale.
  • Vacuum or wet‑wipe surfaces after sanding; don’t let dust accumulate in a small studio.
  • Dispose of sanding dust and used sandpaper responsibly.

8.3. Layer compatibility

  • Make sure underlying layers are fully dry before heavy sanding or scraping, especially with oils.
  • If you work in mixed media, be aware that some materials (e.g., very brittle pastels or certain collage elements) may not tolerate aggressive abrasion.

9. Integrating Surface Alchemy into a Broader Practice

You don’t have to turn every painting into a distressed artifact. Surface Alchemy can be a tool, not a style.

9.1. Use it as a stage, not the whole story

  • Early: to break the pristine surface and generate interesting grounds.
  • Middle: to disrupt stale areas and reveal underlayers.
  • Late: in tiny doses, to soften edges or introduce subtle complexity.

You can combine Surface Alchemy with:

  • Tight realism (e.g., detailed figures over a heavily distressed abstract ground).
  • Graphic design (clean shapes on top of sanded color fields).
  • Minimalist work (one or two distressed elements as focal interest).

The point is not to make everything rough, but to give yourself license to use controlled destruction wherever the painting demands it.

10. Surface Alchemy as a Mindset

At its core, Surface Alchemy is less about tools and more about permission:

  • Permission to ruin something in order to make it better.
  • Permission to treat your painting as a living surface that records change, not a fragile object that must remain pristine.
  • Permission to see mistakes as layers of history that can enrich the final image instead of invalidate it.

When you internalize that, sandpaper and wire brushes stop being scary. They become extensions of your curiosity—ways to ask the painting, “What else is hiding under here?” and then respond honestly to whatever appears.

If you struggle with perfectionism, with fear of starting, or with the paralysis that comes when a painting doesn’t go as planned, try adding a little Surface Alchemy to your practice. Sometimes the shortest path through a block is not another careful brushstroke, but a decisive act of creative destruction.

Comments are closed

    * All prices include mandatory VAT

    Join our Artist Community

    Get 10% off your first order

    Follow us on Social Media

    Be up-to-date with artist news
    Copyright © 2026 Rave Painter's Shop — All Rights Reserved

    The Freedom to Create without Constraint

    Reliable flow and authentic mixing behaviors designed for technique development, studio training, and bold experimentation.

    • Cost-Effective Formulations: High-quality synthetic alternatives that let you work large-scale without budget strain.
    • Predictable Performance: Replicates the working flow and physical characteristics of master-tier mediums.
    • Classroom & Studio Ready: Optimized for rapid studies, frequent practice, and foundational technical courses.

    Archival Quality for Fine Artists

    Maximum pigment loads, verified single-pigment purity, and premium binders engineered for permanence.

    • ASTM Lightfastness Category 1: Guaranteed color retention across decades under gallery conditions.
    • Uncompromised Medium Behavior: Zero structural fillers, ensuring predictable, clean color-mixing profiles.
    • Professional Tier Perks: Access volume pricing on raw materials and large-scale studio containers.

    Click globe to choose language: