1. Stability Meets Texture: The Art of Support Bonding
Most painters know the trade‑off: stretched canvas gives you that familiar bounce under the brush, while rigid panels offer rock‑solid stability but can feel brutally unforgiving. Mounting canvas to a panel—also called support bonding or simply “mounting”—is how you stop choosing between them and get the strengths of both.
When you bond canvas or linen to a rigid support:
- You keep the woven texture so many artists rely on for brush feel and visual grain.
- You eliminate most of the flex that causes cracking in heavy textures and brittle paint films.
- You gain a flatter, more precise surface that’s easier to frame, store, and transport.
For high‑texture work, impasto, or mixed media, a mounted canvas can dramatically reduce the risk of cracking and mechanical damage. The secret is in the adhesive and the pressure—get those wrong and you invite delamination and bubbles; get them right and you have a professional, archival surface that feels fantastic to paint on.
1.1. Why Mount Canvas Instead of Just Using a Panel?
You might ask: if panels are so stable, why not skip fabric entirely and paint directly on wood or hardboard? Sometimes you should—but mounting canvas offers several unique advantages.
1.1.1. Familiar texture, better stability
Many painters are deeply used to the feel of canvas or linen:
- The tiny tooth of the weave catches paint in a certain way.
- Dry brushing, glazing, and scumbling all behave differently on fabric than on a dead‑smooth panel.
- Underpainting and drawing can feel more natural on a slightly absorbent fabric ground.
By adhering canvas to a sealed, primed panel, you preserve that texture while eliminating most of the stretch and bounce that can amplify cracking, especially with heavy texture mediums.
1.1.2. Cracking, texture, and shock
Highly textured work is risky on stretched canvas. When you apply thick texture paste or heavy impasto, and then that flexible surface moves—sags, vibrates, or gets bumped—the brittle top layer may crack.
Rigid supports:
- Resist flexing, which keeps the paint film more stable.
- Better absorb shocks during transport.
- Allow thicker texture if you build in thin, cured layers.
Mounting canvas to a panel is a way to keep your texture options open without sacrificing longevity.
1.1.3. Easier framing and handling
Panels:
- Sit flat in frames and floater frames.
- Are easier to stack and store without sagging.
- Handle humidity changes more predictably than large, lightly stretched canvases.
If you sell or ship work frequently, panel‑mounted canvas can be a practical upgrade.
1.2. Choosing the Right Materials
Before you start bonding, get the support and adhesive right. These two decisions will have the biggest impact on how archival and durable your mounted surfaces are.
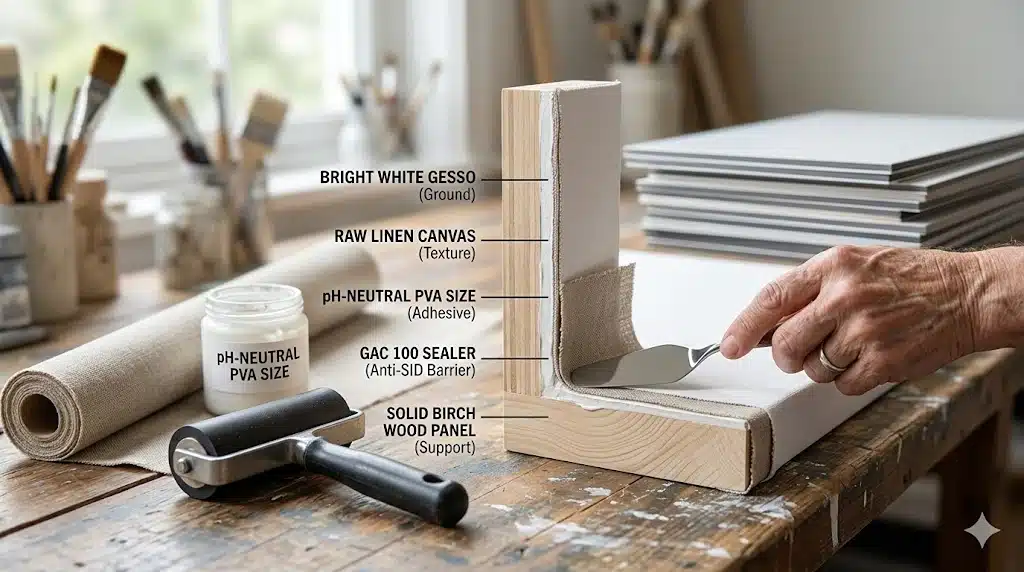
1.2.1. Choosing the panel
Good options include:
- Pre‑sealed, primed panels made for artists (e.g., Claybord, Gessobord, other archival wood panels).
- Properly sealed and primed wood or hardboard panels you’ve prepared yourself.
- Rigid composite panels that are dimensionally stable and sealed.
If you’re starting from raw wood, make sure you:
- Seal with an acrylic sealer to prevent Support Induced Discoloration.
- Prime with gesso or an appropriate ground.
- Seal edges and back if possible to reduce warping.
Mounting canvas on unsealed raw wood is a recipe for future problems.
1.2.2. Choosing the canvas or linen
You can mount:
- Pre‑primed canvas or linen (already gessoed).
- Raw canvas or linen that you plan to prime after mounting.
Pre‑primed fabric saves you work later, while raw fabric gives you total control over the ground. Both can work; just avoid very stiff or heavily primed fabrics that don’t want to bend and lay flat.
1.2.3. Choosing the adhesive
This is where the “archival” part lives. Common, recommended options include:
- Acrylic matte or soft gel medium: Acid‑free, flexible, and designed for permanent bonding. Frequently recommended by panel manufacturers for mounting canvas or linen.
- Heat‑activated archival adhesive films: Used with a dry iron or press to bond without moisture, reducing risk of warping. Very neat and consistent, but require careful temperature and pressure control.
- Specialized conservation adhesives (e.g., BEVA film): Used in restoration and high‑end mounting; can be reversible under specific conditions.
What you want in any case: pH‑neutral, acid‑free formulation; non‑brittle when dry; strong, even bond without staining or bleeding through.
1.3. Step‑by‑Step: Mounting Canvas to a Panel with Acrylic Gel Medium
Below is a practical workflow based on established panel manufacturer guidelines and studio practice.
1.3.1. Tools and materials
- Rigid panel (sealed and primed).
- Canvas or linen (raw or pre‑primed), larger than the panel.
- Archival acrylic matte or soft gel medium (heavy‑body matte medium also works).
- 2″–3″ brush or a small trowel/spreader.
- Rubber brayer or plastic squeegee.
- Wax paper or baking parchment.
- Large, flat board or panel and heavy weights (books, water jugs, etc.).
- Sharp knife (X‑Acto, utility knife) and cutting mat.
1.3.2. Step‑by‑step workflow
- Prepare the panel: Make sure the panel is sealed, primed, and dry. Wipe off any dust. If you plan to wrap the canvas around the edges, ensure the panel edges and back are also sealed so the adhesive doesn’t soak into exposed wood.
- Cut the canvas to size: Place your canvas or linen face down on a clean surface. Cut it so it extends at least 2″ beyond the panel on all sides. This extra margin gives you room for trimming or wrapping.
- Apply the adhesive to the panel: Thin your acrylic gel medium slightly with a bit of water if recommended by the manufacturer, just enough to spread smoothly. Using a 2″–3″ brush or trowel, coat the front surface of the panel with a fairly thick but even layer of gel. Ensure full coverage right to the edges; corners are especially vulnerable to lifting, so you can add a touch more adhesive there.
- Lay the panel onto the canvas: With the canvas still face down, carefully position the panel adhesive‑side down onto the back of the canvas, centered on your measured area. Press down firmly by hand to make initial contact. Wipe away any excess adhesive that squeezes out the sides or onto the back with a damp cloth.
- Press and remove bubbles: Cover the front (fabric side) with a sheet of wax paper or baking parchment to prevent sticking. Starting from the center, use a rubber brayer or plastic squeegee to press outward in all directions systematically: center → top, center → bottom, center → left, center → right, then diagonals. Look and feel for air bubbles; if you see one, roll or press it toward the nearest edge.
- Weight it and let it cure: With wax paper still in place, lay a larger flat board over the canvas. Add even weight—water jugs, heavy books, or bricks—distributed across the surface. Let the panel cure overnight (or as long as the adhesive manufacturer recommends).
- Trim the edges: Once the adhesive is fully cured, place the panel face down on a clean cutting mat. Using a sharp knife, trim the excess canvas flush with the panel edges, letting the edge guide your blade. If you chose to wrap the edges, cut diagonal relief cuts at the corners, fold the fabric neatly over each edge with a bit of extra adhesive, and press/weight again until dry.
1.4. Adhesive Options: Matte Gel, Heat Films, and Conservation Choices
1.4.1. Acrylic gel mediums
Acrylic matte or soft gels are the most accessible option for most painters: designed for fine art use, they remain flexible and non‑brittle, providing strong adhesion when applied evenly and pressed under weight. If you already use acrylic mediums in painting, this option integrates easily into your studio.
1.4.2. Heat‑activated mounting films
These are thin films of archival adhesive that are activated by heat from a dry iron or press: they avoid excess moisture, reducing the risk of warping. They can provide extremely uniform adhesion but require familiarity with temperature control and pressure to avoid scorching or incomplete bonds.
1.4.3. Specialized conservation adhesives
For very valuable or conservation‑minded work, some artists and framers use adhesives like BEVA film or similar products. They are often designed to be reversible under specific conditions (heat, solvents). They require more technical knowledge but can be ideal for restoration or museum contexts.
1.5. Tips for Preventing Cracking in Textured Art
Mounting canvas to a panel is particularly attractive if you love texture. To further minimize cracking risk:
- Build texture in thin layers, allowing each to cure before adding more.
- Avoid extremely thick, single‑pass applications of texture paste on flexible supports.
- Consider mounted surfaces for any work that uses heavy modeling paste, deep impasto, or rigid inclusions.
- Ensure all layers—from canvas to ground to texture paste to paint—are compatible and flexible enough to move together.
1.6. Quick Reference: Professional Canvas‑to‑Panel Mounting Checklist
| Category | Action Items |
|---|
| Support | Choose a sealed, primed panel designed for fine art. Make sure edges and back are sealed if you plan to wrap. |
| Fabric | Use quality canvas or linen, raw or pre‑primed, cut with at least 2″ overlap. |
| Adhesive | Use a pH‑neutral, archival adhesive: acrylic matte/soft gel, archival heat film, or conservation adhesive. Avoid generic hardware‑store glues unless you’ve verified their long‑term performance. |
| Bonding | Apply an even adhesive layer on the panel. Lay the panel onto the fabric, press from the center outward, remove bubbles. Cover, weight, and cure overnight. |
| Finishing | Trim edges flush or wrap and glue. Optionally add a final ground layer (gesso, oil ground, etc.) if the fabric is raw. |
Do this consistently, and you’ll have supports that combine the classic texture of canvas with the quiet stability of a board—ideal for contemporary, mixed‑media, and heavily textured work.