Are Acrylic Mediums Really Necessary? A Deep Guide to Gels, Fluids, and Additives
Art Team
June 7th, 2026
No Comments
Demystifying Acrylic Mediums: A Comprehensive Guide
1. That Overwhelming Shelf: Why Acrylic Mediums Feel So Confusing
If you’ve ever stood in front of the acrylic section in an art store, you know the feeling. The paint itself is straightforward—tubes and jars organized by color, maybe divided into student and artist grades. The confusion begins when your eye drifts to the shelf labeled “mediums.”
Suddenly, you’re looking at: Gloss medium, Matte medium, Soft gel, heavy gel, extra‑heavy gel, Modeling paste and texture gels, Retarder, glazing liquid, flow improver, Pouring medium, crackle paste, fiber paste, and more.
You might wonder: Are these extras actually necessary? Will my paintings be “wrong” if I don’t use them? Do different brands’ mediums really differ that much?
The truth is nuanced. You can absolutely paint with acrylics using just paint and water, especially when you are learning. But mediums exist for real, practical reasons: they make certain techniques possible or easier, improve durability, and let you customize the feel and look of your paint in ways that water alone simply can’t.
This guide aims to demystify acrylic mediums, so you can decide which ones you truly need for your way of working—and which bottles you can comfortably leave on the store shelf.
I. Technical Foundations
1. What Is an Acrylic Medium, Technically?
To understand mediums, it helps to understand the structure of acrylic paint. Most artist‑grade acrylic paints are made of: Pigment – the colored particles; Acrylic polymer binder – a milky emulsion that dries to a clear, flexible plastic film; Water – the vehicle that keeps everything fluid until it evaporates.
When paint dries, the water evaporates and the acrylic polymer particles coalesce into a solid film that holds the pigment in place. If you thin paint heavily with water, you spread out that binder and can weaken the film—especially in very thin glazes. Acrylic mediums are basically the same acrylic binder (plus some modifiers) sold separately from pigment. When you mix medium into paint, you: Change the viscosity (thickness or thinness), Change the sheen (gloss, satin, matte), Sometimes change the drying speed or texture. But you keep enough binder in the system to maintain a coherent, durable paint film.
By contrast, additives like flow improver or retarder are not complete binders on their own. They are meant to be used in small quantities to alter behavior, and must be combined with paint or medium. So, in short: Mediums = mainly acrylic binder, one of the “structural” components of the paint film. Additives = performance boosters, not film formers on their own.
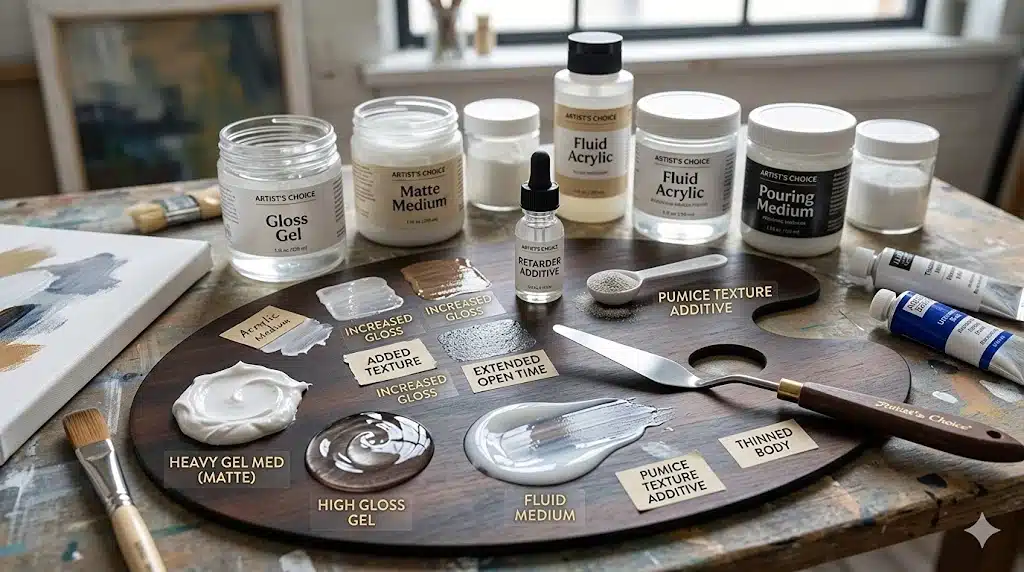
2. The Main Families of Acrylic Mediums (And What They’re For)
Even though each brand names things slightly differently, most acrylic systems revolve around a handful of core medium types:
Fluid mediums – thin, pourable mediums that extend paint, adjust sheen, and help glazing.
Gel mediums – thicker mediums that build body and hold texture.
Texture pastes & specialty gels – pastes with added solids for physical texture.
Additives – retarders, flow improvers, pouring mediums, and similar modifiers.
Once you understand these four families, most labels stop feeling cryptic and start making sense.
3. Brand Differences and Confusing Names
One of the trickiest parts is that different manufacturers give similar products slightly different names, and sometimes combine functions in one product. Examples: “Gloss Medium & Varnish” (older labels) might be marketed as usable both as a medium and as a non‑removable topcoat, but many artists now prefer dedicated removable varnishes for final protection. “Glazing Liquid” from one brand might behave like a slow‑drying fluid medium, while another calls a similar product “Acrylic Retarder Medium.” Some brands divide gels into fine viscosity steps (soft, regular, heavy, extra heavy), others into broader categories (e.g., “gel medium” and “modeling paste”).
Because of this, the safest approach is to: Read the label and technical datasheet: look for viscosity, sheen, primary use, and maximum recommended ratios. Check the manufacturer’s website or chart, where they often group mediums by category and show sample swatches. Once you know the core families (fluid, gel, texture, additive) you can map any brand’s offerings into those buckets.
II. Exploring the Medium Families
1. Fluid Acrylic Mediums: Extending, Glazing, and Controlling Gloss
Fluid mediums are usually the first category painters encounter. They’re often sold as “Gloss Medium,” “Matte Medium,” “Fluid Matte Medium,” “Acrylic Medium,” “Glazing Medium,” or “Acrylic Polymer Medium.”
1.1. What fluid mediums actually do: Thin paint without over‑diluting the binder: you get smoother, more transparent layers while keeping film strength. Extend paint: you can cover more area with less pigment, which is useful with expensive colors. Adjust sheen: Gloss mediums dry clear and shiny; Matte mediums contain matting agents that reduce shine. Improve glazing: they slow down absorbency and keep glazes smooth and streak‑free.
1.2. When fluid mediums are genuinely useful: You love layering and glazing, and want subtle color veils without weakening the paint film. You’re painting large areas and want the paint to spread more economically. You want your work to have a consistent gloss or matte finish rather than random shiny/dull patches. Example use: Mix one part paint with one to three parts fluid gloss medium to create transparent glazes for shadows, skies, or color transitions.
1.3. When you can happily skip them: You mostly paint opaque and alla prima, using paint straight from the tube with minimal thinning. You don’t mind a slightly patchy gloss or plan to even it out with a final varnish. You’re working in a sketchbook or practice panel where long‑term durability is less critical.
2. Gel Mediums: For Body, Texture, and Transparent Impasto
Gel mediums are thicker forms of acrylic binder—ranging from just a bit heavier than paint to extremely stiff. Common labels include “Soft Gel,” “Regular Gel,” “Heavy Gel,” and “Extra‑Heavy Gel” in gloss, matte, or semi‑gloss versions.
2.1. What gels do: Increase thickness and body: transform fluid or medium‑body paint into something closer to oils in feel. Hold brushstrokes and knife marks: crucial for impasto and gestural work. Allow transparent impasto: you can push thick layers of transparent or translucent color without simply making muddy, chalky mixes. Gloss gels dry relatively clear; matte gels dry more opaque and diffuse.
2.2. Soft vs. heavy gels: Soft gel – adds some body but still moves easily; Regular gel – roughly the consistency of heavy‑body paint; Heavy/extra‑heavy gel – very thick; holds peaks and dramatic textures.
2.3. When gel mediums shine: You enjoy expressive brushwork and want physical texture in your paintings. You want to imitate some of the viscosity of oils while staying in acrylics. You do collage or mixed media, using gel as glue for paper and objects.
2.4. When you can skip gels: You mostly paint thin or flat, with little emphasis on surface relief. You prefer smooth blends and graphic shapes rather than sculptural paint.
3. Texture Pastes and Specialty Gels: Building Surfaces
Texture pastes and specialty gels are gels with fillers—things like marble dust, pumice, sand, fibers, or crackle agents added. Typical products: Modeling paste / molding paste, Sand or pumice gel, Fiber paste, Crackle paste or crackle medium.
3.1. What they do: Create three‑dimensional surfaces: ridges, pits, grit, and crackles. Accept paint or ink on top, often emphasizing dry‑brushed color on raised areas. Allow you to carve or scratch into the surface while wet or even after it sets (for some pastes).
3.2. When they’re especially helpful: You’re exploring abstract or mixed media and want strong physical texture. You want to evoke rock, concrete, weathered walls, bark, or other tactile surfaces. You like techniques such as sgraffito, where you scratch through layers to reveal underlying color.
3.3. When to skip them: You prefer clean, smooth surfaces. Your subject matter doesn’t benefit from physical texture.
III. Additives and Modifiers
1. Retarders and Slow-Drying Mediums: Buying Working Time
One of the biggest differences between oils and acrylics is drying time. Acrylics can skin over in minutes, especially in warm, dry environments, making soft blending difficult.
1.1. Retarder (additive): Retarder is usually sold as a clear liquid additive designed to slow the drying of acrylic paint. Used in small amounts—often less than 15% of the mixture is recommended. Too much can lead to tacky, never‑fully‑dry surfaces.
1.2. Slow-drying mediums / glazing liquids: Some brands offer glazing mediums or “open” mediums that combine binder with retarder in a balanced way. They: Extend open time for blending; Maintain good film strength and surface qualities; Are designed to be mixed liberally with paint.
1.3. When they really help: You’re painting gradients (like skies or smooth skin tones) and need smooth blends. You work in a hot, dry studio where paint dries almost as soon as it’s applied. You’re transitioning from oils and miss the ability to work wet‑in‑wet.
1.4. When you can skip them: You like acrylic’s fast drying and build form by layering rather than blending. You use other tactics (misting bottle, stay‑wet palette) to keep paint workable.
2. Flow Improvers and Airbrush Mediums: Smoothness
Flow improvers, flow aid, or airbrush mediums reduce surface tension so paint flows more smoothly and levels out.
2.1. What they do: Help paint spread evenly without streaks or “brush drag.” Assist with fine detail, line work, and calligraphic strokes. Prevent beading on slick or slightly resistent surfaces when properly used.
2.2. When they’re useful: You do lettering, outlines, or detailed work with small brushes. You work with airbrushes or want ink‑like consistency from tube paint. You enjoy fluid art or want extremely smooth, brushless fields of color.
2.3. When to skip them: You enjoy visible brush marks and don’t need ultra‑smooth coverage. Plain water plus a bit of medium already gives you the flow you want.
3. Pouring Mediums: For Pours, Not Just Any Thick Paint
Acrylic pouring has exploded in popularity, and pouring mediums are formulated specifically for this technique.
3.1. What pouring mediums do: Turn standard acrylic paint into a self‑leveling, pourable mixture. Reduce crazing (small cracks) and unwanted texture when paint dries thick. Maintain a flexible, durable film even when used in deep pours. Some pouring mediums are designed to encourage cell formation when used with silicone oils or other additives; others focus on perfectly smooth surfaces.
3.2. When they help: You are actively doing acrylic pouring, puddle pours, swipe techniques, etc. You pour fairly thick layers and want them to dry even and strong.
3.3. When you can ignore them: You’re not doing pour techniques. You only occasionally want slightly more fluid paint; a combination of fluid medium and water works fine.
IV. Practical Strategies and Troubleshooting
1. How to Test Mediums Without Wasting Paint
Instead of guessing, you can run a simple “medium chart” on a spare board or sheet.
1.1. Setup: Draw a grid and label columns: Pure paint, Paint + water (1:1), Paint + gloss medium, Paint + matte medium, Paint + soft gel, Paint + heavy gel, Paint + glazing liquid, Paint + retarder, Paint + flow improver. Use one or two colors you know well.
1.2. What to observe: When dry, compare: Transparency (intensity vs. chalkiness), Sheen (gloss, matte, or satin), Surface (brush marks vs. leveling), Feel (hard/slick vs. soft/velvety). This teaches you how each medium actually behaves in your studio conditions.
2. When Acrylic Mediums Are Worth the Money
Mediums are most worth it when they address specific, recurring issues: Your glazes look streaky or weak; Your paint dries too fast for blending; You crave thicker textures but heavy‑body paint is too stiff; You dislike random shiny/dull spots. They are also a smart investment if you are building a professional practice and care about archival quality, or frequently explore mixed media and collage.
3. When You Can Keep Things Very Simple
On the other hand, you do not need a large collection. You can use just paint + water for studies. Add one versatile fluid medium (gloss or matte) when you want better glazes. Delay purchasing specialty products until you feel the lack of a specific function. It’s often better to fully understand a small number of mediums than to own many and barely use them.
4. A Smart Minimal Set for Most Painters
If you want a practical starting kit: One fluid medium (Gloss or Matte); One gel medium (Soft gel or regular/heavy gel); One slow-drying medium or glazing liquid (optional but very helpful if you blend a lot). That’s it. You can paint for years with just these.
5. Common Problems Caused by Misusing Mediums (and How to Fix Them)
5.1. Paint that stays tacky: Likely causes: Too much retarder or slow‑drying medium; thick applications in high humidity. Fixes: Reduce retarder usage below 10–15%; use balanced glazing liquids; apply thinner layers.
5.2. Cloudy or “milky” appearance: Possible causes: Over‑use of matte mediums or gels; using opaque colors mixed heavily into clear gels. Fixes: Use gloss mediums for clear glazes; keep matte mixtures lean.
5.3. Cracking, crazing, or sinking: Cracking from thick layers with insufficient binder; using standard mediums for deep pours. Fixes: Switch to dedicated pouring medium; build up thickness in multiple layers. Sinking: Use a thin layer of gloss medium to seal grounds or apply a unifying layer before varnish.
V. Longevity and Style-Specific Use
1. Mediums and Longevity: Thinking Like a Conservator
Properly used mediums can improve long‑term stability. Key principles: Binder concentration matters (medium instead of excessive water keeps the film strong); Flexibility (acrylic gels remain flexible for canvas); Surface quality (well‑sealed surfaces accept varnishes more predictably). If you sell work, a well‑understood use of mediums is part of professional practice.
2. Matching Mediums to Painting Styles: A Quick Reference
Expressive, textured, abstract: Heavy or regular gel, modeling paste, sand/fiber gels.
Realist, layered, glazing-heavy: Gloss fluid medium or dedicated glazing medium; small amount of retarder.
Illustrative, flat graphic: Matte or satin fluid medium; Flow improver for sharp lines.
Mixed media, collage, text + images: Soft gel or regular gel as adhesive; Texture pastes for grounds.
Acrylic pouring / fluid abstract: Pouring medium designed for your chosen technique.
3. A Simple Decision Checklist: Do I Need a Medium Here?
Before buying or using a new medium, ask: What problem am I trying to solve? Is there a medium designed for that? Can I try a small size or test first? If you can’t clearly name the problem, you probably don’t need the medium yet. Keep painting, and let your practice tell you when it’s time to add a new tool.
Discover how artist varnish protects oil and acrylic paintings from dust, UV light, and aging. Learn when and how to varnish, gloss vs satin vs matte, removable varnishes, and long‑term…
Learn the core principles of perspective drawing with clear explanations, visual logic, and practical steps to create convincing spatial depth in your art.
1. Invisible Armor: How to Protect Your Artwork Online Through Watermarking and Copyright Control 1.1. The Hook: The Digital Mirage You upload a painting you spent weeks perfecting—a swirl of…
Learn what linseed oil does in oil painting, the different types available, how to use it safely with the fat-over-lean rule, and when to keep your mixtures simple.
Turn your love of animals into a professional pet portrait business. Learn how to paint convincing eyes and fur, tell emotional “pet stories,” market your work, and use certificates of…
Learn what “fat over lean” really means in oil painting, why it prevents cracking, and how to apply it step‑by‑step using modern mediums, ratios, and practical examples for stable, long‑lasting…
Stuck in perfectionism or artist’s block? Learn how to use sandpaper, wire brushes, scraping, and distressed gesso as “surface alchemy” to reveal layers, add depth, and free up your painting…