1. The Hook: “Is It Me… or This Tablet?”
Many artists arrive at digital painting the same way. You see someone paint a luminous portrait in thirty seconds on a screen. You watch time-lapse videos where color blends like butter and undo makes every stroke fearless. Something in you says, I want that.
So you buy the first tablet on sale. You download whatever software the internet mentions the loudest. You open a blank canvas, start drawing… and it feels terrible. Your lines wobble. Your hand and eye are disconnected. The brush engine makes mud, not magic. Within an hour, you quietly wonder: Am I just bad at digital art?
Most of the time, no — you are not bad at digital art. You are just trying to learn a new medium while also wrestling with hardware that does not fit you and software that speaks a language you have not learned yet. A bit like learning oil painting using a frayed brush on printer paper.
The goal of this guide is not to push a brand. It is to help you choose a first tablet and painting program that supports your hand, your body, and your way of thinking, so you can actually enjoy learning digital painting instead of fighting your tools.
2. Deep Dive: What Makes Digital Painting Feel “Right”?
Before you compare models or price tags, you need to understand what actually matters when you are painting digitally.
2.1. The Three Big Comfort Factors
2.1.1. Hand–Eye Connection
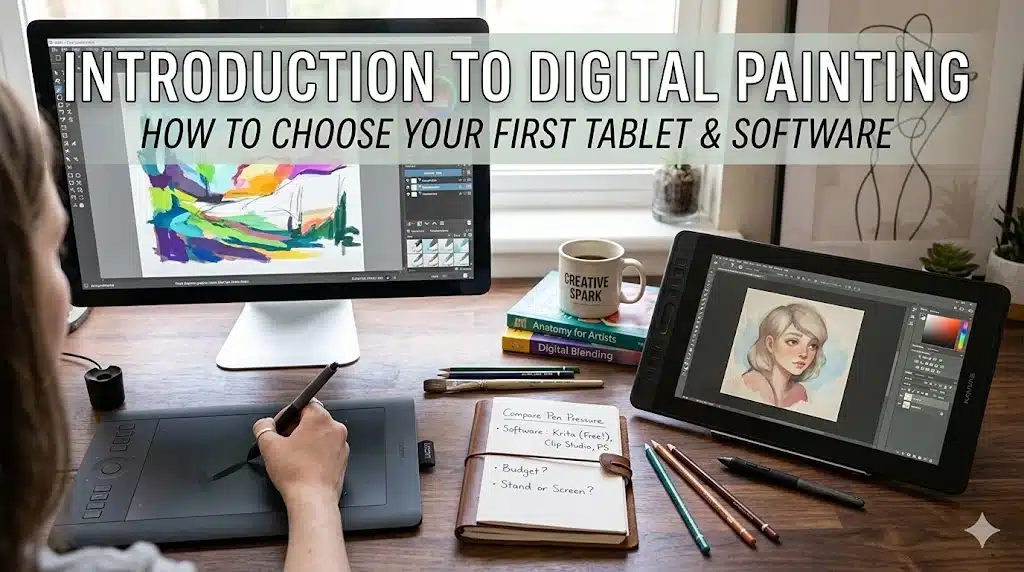
On a “pen tablet” without a screen, you draw on your desk while watching your cursor on a monitor. This is like drawing with a mirror, and it takes getting used to.
On a “pen display” tablet, you draw directly on the screen with a stylus. This feels more natural to most traditional artists because your hand touches the image itself.
2.1.2. Pen Feel and Pressure Control
You want a stylus that responds smoothly to changes in pressure so your lines can taper and your brushstrokes can feel alive. Modern beginner tablets from brands like Wacom, Huion, XP-Pen, and Ugee all offer pressure-sensitive pens designed for drawing.
Good pressure response means you can sketch lightly, press harder for bold strokes, and paint with subtle variation instead of digital “marker lines.”
2.1.3. Screen or Surface Texture
Very slippery glass can make your strokes feel like skating on ice; a slightly matte or textured surface gives you the tooth you are used to from paper or canvas.
Some pen displays (for example laminated screens on modern devices) reduce parallax — the gap between pen tip and cursor — making strokes feel more precise.
If you understand these three, you will read any tablet spec sheet differently. Instead of chasing endless features, you will ask: Will this feel comfortable to draw on, for my actual hand and posture?
3. Choosing a Tablet Type: Pen Tablet vs. Pen Display vs. Tablet Computer
There are three main “families” of digital painting devices. Each has trade-offs in price, comfort, and flexibility.
3.1. 1. Pen Tablets (No Screen)
These are flat devices you connect to a computer. You draw on the tablet surface while looking at your monitor.
Pros:
- Very affordable, especially for larger active areas.
- Light, portable, and durable.
- Let you use your existing computer’s processing power and monitor.
Cons:
- Hand–eye disconnect takes time to adapt to.
- You depend on your computer’s screen quality and color accuracy.
Beginner-oriented models from brands like Wacom, Huion, XP-Pen, or Ugee often include:
- Pressure-sensitive pens with replacement nibs.
- Customizable buttons (called “express keys”) you can map to actions like undo or brush size changes.
For many artists, an entry-level pen tablet is the smartest first step: low cost, high capability, and enough features to learn the medium.
3.2. 2. Pen Display Tablets (Screen You Draw On)
These devices are essentially monitors you draw on with a stylus, connected to a computer.
Pros:
- Direct drawing on the image like a sketchbook.
- Often better for traditional painters who want a more intuitive feel.
- Some models offer laminated displays that reduce parallax, improving accuracy.
Cons:
- More expensive than non-display tablets.
- Bulkier and less portable.
- Require extra cables, power, and a compatible computer.
For larger paintings, having your hand on the image can be incredibly grounding. If you know you are committed to digital painting and have the budget, a modestly sized pen display can be a powerful first device.
3.3. 3. Tablet Computers (Standalone Devices)
Devices like the Apple iPad with Apple Pencil or certain Windows-based pen computers fall into this category.
Pros:
- All-in-one: screen, computer, and stylus in one portable device.
- Excellent touch gestures for zooming and rotating.
- Great for couch sketching, travel, and working in cafes.
Cons:
- Often the most expensive option if you include stylus cost.
- You are tied to the applications available for that operating system (for example some desktop-only painting software may not be available).
- Upgrades and repairs can be costly.
Many beginners love the immediacy and simplicity of tablet computers, especially when paired with beginner-friendly software like Procreate or similar painting applications.
4. What Specs Actually Matter (And Which To Ignore)
Technical specifications can feel like alphabet soup. Let us translate.
4.1. Active Area Size
On pen tablets, the “active area” is the part you can draw on. Writers who test tablets note that:
- Larger active areas make it easier to adapt because your hand movements can be broader and more natural.
- For beginners, something around an A5 size or slightly larger is often a good starting point: enough room to move, but not so big it becomes unwieldy.
On pen displays or tablet computers, you are choosing screen size instead. Around 13–16 inches can be a comfortable balance for painting; bigger screens give more space but are heavier and more expensive.
4.2. Pressure Levels
You will see numbers like “8192 levels of pressure sensitivity.” In practice, once you are above a basic threshold, you will not feel the difference between, for example, four thousand and eight thousand levels; you will simply feel whether the curve is smooth and predictable.
Most modern beginner tablets already offer pressure sensitivity good enough for professional work.
4.3. Tilt Support
Tilt allows the software to read the angle of your stylus, so brushes can behave more like real pencils or flat brushes. It is nice to have, especially for painting or calligraphy, but not mandatory for your first setup.
If two otherwise similar tablets differ only by tilt support, and the cost difference is small, choose the one with tilt. It will give you more expressive brush options as you advance.
4.4. Resolution, Color, and Parallax (for Displays)
When looking at pen displays or tablet computers, pay attention to:
- Screen resolution (for example Full High Definition). Higher resolution makes details look crisp.
- Color accuracy: a wider color gamut and good calibration help your digital colors translate better to print.
- Laminated screens: these reduce the visual gap between the glass surface and the image underneath, resulting in less parallax and a more “on-paper” feel.
For a first device, you do not need top-end specifications, but you do want a screen that does not strain your eyes or distort your colors dramatically.
5. Software: Finding a Painting Program That Feels Like Home
Once you have a device, you need a digital “studio.” Different software has different personalities.
5.1. What You Need as a Beginner
At minimum, your painting software should offer:
- Layers (so you can separate sketch, color, shading, and effects).
- Pressure-sensitive brushes.
- Basic transform tools (scale, rotate, distort).
- A responsive interface that does not overwhelm you with menus.
Beyond that, the most important thing is how the program feels when you sketch and paint. Is it laggy? Does it encourage you to play or make you hunt through settings?
5.2. Popular Beginner-Friendly Options
Testing and reviews often highlight a few standouts for people starting digital painting:
5.2.1. Procreate (tablet computer on iPad)
Frequently recommended by artists as a beginner-friendly option: it is intuitive, has a straightforward tool layout, and a short learning curve, while still offering a wide range of creative features.
Ideal if you like sketchbook-style painting and working on a tablet computer.
5.2.2. Krita (desktop)
A free, open-source painting program praised as an excellent budget choice that balances affordability with serious functionality for digital painting and illustration.
Great if you are on Windows, macOS, or Linux and want a painting-focused environment.
5.2.3. Clip Studio Paint Pro
Known for its depth, especially for comics and illustration. It has a rich brush engine and panels, though the interface can feel complex at first.
Strong choice if you want to grow into more advanced workflows over time.
5.2.4. Autodesk Sketchbook
Offers a minimalist, intuitive interface and is free, with a generous brush set and layer support.
Good for sketching and lightweight painting without getting lost in features.
5.2.5. Other options like Adobe Fresco, MediBang Paint, ibis Paint X
These are often recommended to beginners for their natural media simulation, portability, and beginner-friendly interfaces, especially on tablets and mobile devices.
You do not need to marry one program on day one. It is perfectly fine to test two or three and see which one makes you forget the tool and focus on the drawing.
6. Actionable Steps: Choosing Your First Setup
Let us build your first digital painting setup step by step.
6.1. Step One: Decide Where You Want to Work
Ask yourself:
- Do you already own a decent computer with a monitor you like?
- Do you want to paint mostly at a desk, or also on the sofa, on the train, in a café?
If you already have a good computer and mostly work at a desk, a pen tablet or pen display that connects to it is efficient.
If you crave portability and “sketchbook anywhere” freedom, investigate tablet computers with stylus support.
6.2. Step Two: Choose Tablet Type Based on Budget and Comfort
Rough guideline:
- Tight budget / testing the waters: start with a mid-sized pen tablet (non-display). You get professional-grade input with minimal cost.
- Moderate budget / you know you love drawing: consider a smaller pen display to gain direct-on-screen drawing.
- Higher budget / you want portability: consider an iPad with Apple Pencil or a similar pen-enabled tablet computer and a painting application like Procreate.
Whichever you choose, aim for:
- An active area or screen size large enough to move your arm, not just your wrist.
- A stylus with good reviews for comfort and responsiveness.
6.3. Step Three: Pick One Primary Painting Program
To avoid overwhelm, choose one program to commit to for at least a month. For example:
- Desktop pen tablet: Krita or Clip Studio Paint Pro.
- Tablet computer: Procreate, Adobe Fresco, or another intuitive app.
Install it, update it, and ignore other programs for a while. Depth comes from familiarity, not collecting software.
6.4. Step Four: Set Up Your Workspace Intentionally
- Position your screen so your neck is neutral, not craned.
- Angle your tablet comfortably, or use a stand for a pen display.
- Map a few tablet buttons to essentials: undo, brush size up and down, color picker.
- Consider a drawing glove to reduce friction and accidental touches.
A physically comfortable setup will make learning digital painting dramatically easier.
7. Actionable Exercises: Getting Comfortable With Your New Tools
Your first days with a tablet are not about masterpieces. They are about making the device disappear from your awareness.
7.1. Exercise One: Hand–Eye Calibration
- Open a new canvas in your chosen software.
- Draw straight lines across the page, both horizontal and vertical.
- Draw circles and ellipses at different sizes.
- Try drawing a simple cube and a sphere freehand.
Focus on how your wrist and arm feel, and how the stylus pressure translates into line thickness. Do this for ten minutes a day for a week. It builds muscle memory quickly.
7.2. Exercise Two: Pressure and Brush Exploration
- Choose a pencil-like brush and draw a gradient line — start light, press harder, then lighten again.
- Switch to a soft round brush and paint from light to dark by varying pressure only.
- Experiment with a textured brush that mimics charcoal or paint.
Notice which brush responses feel intuitive and which feel “slippery” or harsh. Start saving a small set of favorite brushes instead of constantly browsing more.
7.3. Exercise Three: Layers and Simple Painting
- On one layer, sketch a simple object from life: a mug, a shoe, a plant.
- On a new layer below, block in flat color.
- On another layer above the color, paint shadows and highlights.
Play with layer blending modes if your software supports them, but do not overcomplicate yet. The goal is to understand how layers can separate tasks and mistakes.
8. Breaking the Rules: When to Ignore “Best Practices”
Digital art forums are full of rules: “Always get this brand,” “Never start on a small tablet,” “Real artists use this software.” You are allowed to ignore all of that when it conflicts with how you actually work.
8.1. Rule to Break: You Must Start With a Non-Display Tablet
Many people insist you should “suffer through” hand–eye disconnect because it makes you better. For some artists, especially those with coordination challenges or who are deeply rooted in traditional painting, a pen display or tablet computer is far kinder on the brain.
If you try a non-display tablet and your body says no after genuinely practicing, it is okay to prioritize comfort and choose a screen-based device.
8.2. Rule to Break: You Must Use Professional Software From Day One
You do not have to begin with the most complex or industry-standard tool. A free or low-cost, beginner-friendly program that makes sense to you is a better choice than a feature-stacked program that intimidates you.
If Procreate or Krita or Autodesk Sketchbook makes you excited to open your canvas, that is more important than whether studios use it.
8.3. Rule to Break: You Must Chase Specs
It is easy to obsess over pressure levels, color gamuts, or the latest model years. But at the end of the day, a comfortably sized tablet, a pen you enjoy holding, and software you understand will take you much further than a cutting-edge device you rarely use.
Your art will grow faster than your hardware. You can upgrade later when your practice and income justify it.
9. Conclusion: Choose Tools That Invite You Back
Starting digital painting is not about getting the perfect setup on the first try. It is about choosing tools that make you want to come back tomorrow. Tools that feel like a quiet “yes” in your hand, not a constant argument.
Your first tablet does not need to be your forever tablet. Your first painting program does not need to be your last. What matters is that you give yourself a setup that respects your body, your budget, and your creative curiosity — a setup that lets you fail, experiment, undo, and try again without the voice of “I bought the wrong thing” in your head.
Somewhere between the hardware specifications and the software menus, there is a moment where the line on the screen feels like a line in a sketchbook. When that happens, you will stop thinking of “digital” as a lesser version of “real” painting. It will simply be another medium you have claimed as yours.
Let your first choices be simple, honest, and kind to yourself. The real magic is not in the tablet or the program — it is in the hand that learns to dance with them.
1. The Hook: “Is It Me… or This Tablet?”
Many artists arrive at digital painting the same way. You see someone paint a luminous portrait in thirty seconds on a screen. You watch time-lapse videos where color blends like butter and undo makes every stroke fearless. Something in you says, I want that.
So you buy the first tablet on sale. You download whatever software the internet mentions the loudest. You open a blank canvas, start drawing… and it feels terrible. Your lines wobble. Your hand and eye are disconnected. The brush engine makes mud, not magic. Within an hour, you quietly wonder: Am I just bad at digital art?
Most of the time, no — you are not bad at digital art. You are just trying to learn a new medium while also wrestling with hardware that does not fit you and software that speaks a language you have not learned yet. A bit like learning oil painting using a frayed brush on printer paper.
The goal of this guide is not to push a brand. It is to help you choose a first tablet and painting program that supports your hand, your body, and your way of thinking, so you can actually enjoy learning digital painting instead of fighting your tools.
2. Deep Dive: What Makes Digital Painting Feel “Right”?
Before you compare models or price tags, you need to understand what actually matters when you are painting digitally.
2.1. The Three Big Comfort Factors
2.1.1. Hand–Eye Connection
On a “pen tablet” without a screen, you draw on your desk while watching your cursor on a monitor. This is like drawing with a mirror, and it takes getting used to.
On a “pen display” tablet, you draw directly on the screen with a stylus. This feels more natural to most traditional artists because your hand touches the image itself.
2.1.2. Pen Feel and Pressure Control
You want a stylus that responds smoothly to changes in pressure so your lines can taper and your brushstrokes can feel alive. Modern beginner tablets from brands like Wacom, Huion, XP-Pen, and Ugee all offer pressure-sensitive pens designed for drawing.
Good pressure response means you can sketch lightly, press harder for bold strokes, and paint with subtle variation instead of digital “marker lines.”
2.1.3. Screen or Surface Texture
Very slippery glass can make your strokes feel like skating on ice; a slightly matte or textured surface gives you the tooth you are used to from paper or canvas.
Some pen displays (for example laminated screens on modern devices) reduce parallax — the gap between pen tip and cursor — making strokes feel more precise.
If you understand these three, you will read any tablet spec sheet differently. Instead of chasing endless features, you will ask: Will this feel comfortable to draw on, for my actual hand and posture?
3. Choosing a Tablet Type: Pen Tablet vs. Pen Display vs. Tablet Computer
There are three main “families” of digital painting devices. Each has trade-offs in price, comfort, and flexibility.
3.1. 1. Pen Tablets (No Screen)
These are flat devices you connect to a computer. You draw on the tablet surface while looking at your monitor.
Pros:
- Very affordable, especially for larger active areas.
- Light, portable, and durable.
- Let you use your existing computer’s processing power and monitor.
Cons:
- Hand–eye disconnect takes time to adapt to.
- You depend on your computer’s screen quality and color accuracy.
Beginner-oriented models from brands like Wacom, Huion, XP-Pen, or Ugee often include:
- Pressure-sensitive pens with replacement nibs.
- Customizable buttons (called “express keys”) you can map to actions like undo or brush size changes.
For many artists, an entry-level pen tablet is the smartest first step: low cost, high capability, and enough features to learn the medium.
3.2. 2. Pen Display Tablets (Screen You Draw On)
These devices are essentially monitors you draw on with a stylus, connected to a computer.
Pros:
- Direct drawing on the image like a sketchbook.
- Often better for traditional painters who want a more intuitive feel.
- Some models offer laminated displays that reduce parallax, improving accuracy.
Cons:
- More expensive than non-display tablets.
- Bulkier and less portable.
- Require extra cables, power, and a compatible computer.
For larger paintings, having your hand on the image can be incredibly grounding. If you know you are committed to digital painting and have the budget, a modestly sized pen display can be a powerful first device.
3.3. 3. Tablet Computers (Standalone Devices)
Devices like the Apple iPad with Apple Pencil or certain Windows-based pen computers fall into this category.
Pros:
- All-in-one: screen, computer, and stylus in one portable device.
- Excellent touch gestures for zooming and rotating.
- Great for couch sketching, travel, and working in cafes.
Cons:
- Often the most expensive option if you include stylus cost.
- You are tied to the applications available for that operating system (for example some desktop-only painting software may not be available).
- Upgrades and repairs can be costly.
Many beginners love the immediacy and simplicity of tablet computers, especially when paired with beginner-friendly software like Procreate or similar painting applications.
4. What Specs Actually Matter (And Which To Ignore)
Technical specifications can feel like alphabet soup. Let us translate.
4.1. Active Area Size
On pen tablets, the “active area” is the part you can draw on. Writers who test tablets note that:
- Larger active areas make it easier to adapt because your hand movements can be broader and more natural.
- For beginners, something around an A5 size or slightly larger is often a good starting point: enough room to move, but not so big it becomes unwieldy.
On pen displays or tablet computers, you are choosing screen size instead. Around 13–16 inches can be a comfortable balance for painting; bigger screens give more space but are heavier and more expensive.
4.2. Pressure Levels
You will see numbers like “8192 levels of pressure sensitivity.” In practice, once you are above a basic threshold, you will not feel the difference between, for example, four thousand and eight thousand levels; you will simply feel whether the curve is smooth and predictable.
Most modern beginner tablets already offer pressure sensitivity good enough for professional work.
4.3. Tilt Support
Tilt allows the software to read the angle of your stylus, so brushes can behave more like real pencils or flat brushes. It is nice to have, especially for painting or calligraphy, but not mandatory for your first setup.
If two otherwise similar tablets differ only by tilt support, and the cost difference is small, choose the one with tilt. It will give you more expressive brush options as you advance.
4.4. Resolution, Color, and Parallax (for Displays)
When looking at pen displays or tablet computers, pay attention to:
- Screen resolution (for example Full High Definition). Higher resolution makes details look crisp.
- Color accuracy: a wider color gamut and good calibration help your digital colors translate better to print.
- Laminated screens: these reduce the visual gap between the glass surface and the image underneath, resulting in less parallax and a more “on-paper” feel.
For a first device, you do not need top-end specifications, but you do want a screen that does not strain your eyes or distort your colors dramatically.
5. Software: Finding a Painting Program That Feels Like Home
Once you have a device, you need a digital “studio.” Different software has different personalities.
5.1. What You Need as a Beginner
At minimum, your painting software should offer:
- Layers (so you can separate sketch, color, shading, and effects).
- Pressure-sensitive brushes.
- Basic transform tools (scale, rotate, distort).
- A responsive interface that does not overwhelm you with menus.
Beyond that, the most important thing is how the program feels when you sketch and paint. Is it laggy? Does it encourage you to play or make you hunt through settings?
5.2. Popular Beginner-Friendly Options
Testing and reviews often highlight a few standouts for people starting digital painting:
5.2.1. Procreate (tablet computer on iPad)
Frequently recommended by artists as a beginner-friendly option: it is intuitive, has a straightforward tool layout, and a short learning curve, while still offering a wide range of creative features.
Ideal if you like sketchbook-style painting and working on a tablet computer.
5.2.2. Krita (desktop)
A free, open-source painting program praised as an excellent budget choice that balances affordability with serious functionality for digital painting and illustration.
Great if you are on Windows, macOS, or Linux and want a painting-focused environment.
5.2.3. Clip Studio Paint Pro
Known for its depth, especially for comics and illustration. It has a rich brush engine and panels, though the interface can feel complex at first.
Strong choice if you want to grow into more advanced workflows over time.
5.2.4. Autodesk Sketchbook
Offers a minimalist, intuitive interface and is free, with a generous brush set and layer support.
Good for sketching and lightweight painting without getting lost in features.
5.2.5. Other options like Adobe Fresco, MediBang Paint, ibis Paint X
These are often recommended to beginners for their natural media simulation, portability, and beginner-friendly interfaces, especially on tablets and mobile devices.
You do not need to marry one program on day one. It is perfectly fine to test two or three and see which one makes you forget the tool and focus on the drawing.
6. Actionable Steps: Choosing Your First Setup
Let us build your first digital painting setup step by step.
6.1. Step One: Decide Where You Want to Work
Ask yourself:
- Do you already own a decent computer with a monitor you like?
- Do you want to paint mostly at a desk, or also on the sofa, on the train, in a café?
If you already have a good computer and mostly work at a desk, a pen tablet or pen display that connects to it is efficient.
If you crave portability and “sketchbook anywhere” freedom, investigate tablet computers with stylus support.
6.2. Step Two: Choose Tablet Type Based on Budget and Comfort
Rough guideline:
- Tight budget / testing the waters: start with a mid-sized pen tablet (non-display). You get professional-grade input with minimal cost.
- Moderate budget / you know you love drawing: consider a smaller pen display to gain direct-on-screen drawing.
- Higher budget / you want portability: consider an iPad with Apple Pencil or a similar pen-enabled tablet computer and a painting application like Procreate.
Whichever you choose, aim for:
- An active area or screen size large enough to move your arm, not just your wrist.
- A stylus with good reviews for comfort and responsiveness.
6.3. Step Three: Pick One Primary Painting Program
To avoid overwhelm, choose one program to commit to for at least a month. For example:
- Desktop pen tablet: Krita or Clip Studio Paint Pro.
- Tablet computer: Procreate, Adobe Fresco, or another intuitive app.
Install it, update it, and ignore other programs for a while. Depth comes from familiarity, not collecting software.
6.4. Step Four: Set Up Your Workspace Intentionally
- Position your screen so your neck is neutral, not craned.
- Angle your tablet comfortably, or use a stand for a pen display.
- Map a few tablet buttons to essentials: undo, brush size up and down, color picker.
- Consider a drawing glove to reduce friction and accidental touches.
A physically comfortable setup will make learning digital painting dramatically easier.
7. Actionable Exercises: Getting Comfortable With Your New Tools
Your first days with a tablet are not about masterpieces. They are about making the device disappear from your awareness.
7.1. Exercise One: Hand–Eye Calibration
- Open a new canvas in your chosen software.
- Draw straight lines across the page, both horizontal and vertical.
- Draw circles and ellipses at different sizes.
- Try drawing a simple cube and a sphere freehand.
Focus on how your wrist and arm feel, and how the stylus pressure translates into line thickness. Do this for ten minutes a day for a week. It builds muscle memory quickly.
7.2. Exercise Two: Pressure and Brush Exploration
- Choose a pencil-like brush and draw a gradient line — start light, press harder, then lighten again.
- Switch to a soft round brush and paint from light to dark by varying pressure only.
- Experiment with a textured brush that mimics charcoal or paint.
Notice which brush responses feel intuitive and which feel “slippery” or harsh. Start saving a small set of favorite brushes instead of constantly browsing more.
7.3. Exercise Three: Layers and Simple Painting
- On one layer, sketch a simple object from life: a mug, a shoe, a plant.
- On a new layer below, block in flat color.
- On another layer above the color, paint shadows and highlights.
Play with layer blending modes if your software supports them, but do not overcomplicate yet. The goal is to understand how layers can separate tasks and mistakes.
8. Breaking the Rules: When to Ignore “Best Practices”
Digital art forums are full of rules: “Always get this brand,” “Never start on a small tablet,” “Real artists use this software.” You are allowed to ignore all of that when it conflicts with how you actually work.
8.1. Rule to Break: You Must Start With a Non-Display Tablet
Many people insist you should “suffer through” hand–eye disconnect because it makes you better. For some artists, especially those with coordination challenges or who are deeply rooted in traditional painting, a pen display or tablet computer is far kinder on the brain.
If you try a non-display tablet and your body says no after genuinely practicing, it is okay to prioritize comfort and choose a screen-based device.
8.2. Rule to Break: You Must Use Professional Software From Day One
You do not have to begin with the most complex or industry-standard tool. A free or low-cost, beginner-friendly program that makes sense to you is a better choice than a feature-stacked program that intimidates you.
If Procreate or Krita or Autodesk Sketchbook makes you excited to open your canvas, that is more important than whether studios use it.
8.3. Rule to Break: You Must Chase Specs
It is easy to obsess over pressure levels, color gamuts, or the latest model years. But at the end of the day, a comfortably sized tablet, a pen you enjoy holding, and software you understand will take you much further than a cutting-edge device you rarely use.
Your art will grow faster than your hardware. You can upgrade later when your practice and income justify it.
9. Conclusion: Choose Tools That Invite You Back
Starting digital painting is not about getting the perfect setup on the first try. It is about choosing tools that make you want to come back tomorrow. Tools that feel like a quiet “yes” in your hand, not a constant argument.
Your first tablet does not need to be your forever tablet. Your first painting program does not need to be your last. What matters is that you give yourself a setup that respects your body, your budget, and your creative curiosity — a setup that lets you fail, experiment, undo, and try again without the voice of “I bought the wrong thing” in your head.
Somewhere between the hardware specifications and the software menus, there is a moment where the line on the screen feels like a line in a sketchbook. When that happens, you will stop thinking of “digital” as a lesser version of “real” painting. It will simply be another medium you have claimed as yours.
Let your first choices be simple, honest, and kind to yourself. The real magic is not in the tablet or the program — it is in the hand that learns to dance with them.