Scratching for Impact: A Beginner’s Guide to Sgraffito in Painting and Mixed Media
Art Team
June 7th, 2026
No Comments
Sgraffito: The Art of Scratching Through Layers
1. What Is Sgraffito, Really?
Sgraffito looks dramatic, but the underlying idea is simple: you scratch through a top layer to reveal a different layer underneath. The word comes from the Italian sgraffiare, meaning “to scratch,” and the technique appears across art history—from Neolithic ceramics and Renaissance façades to modern abstract painting.
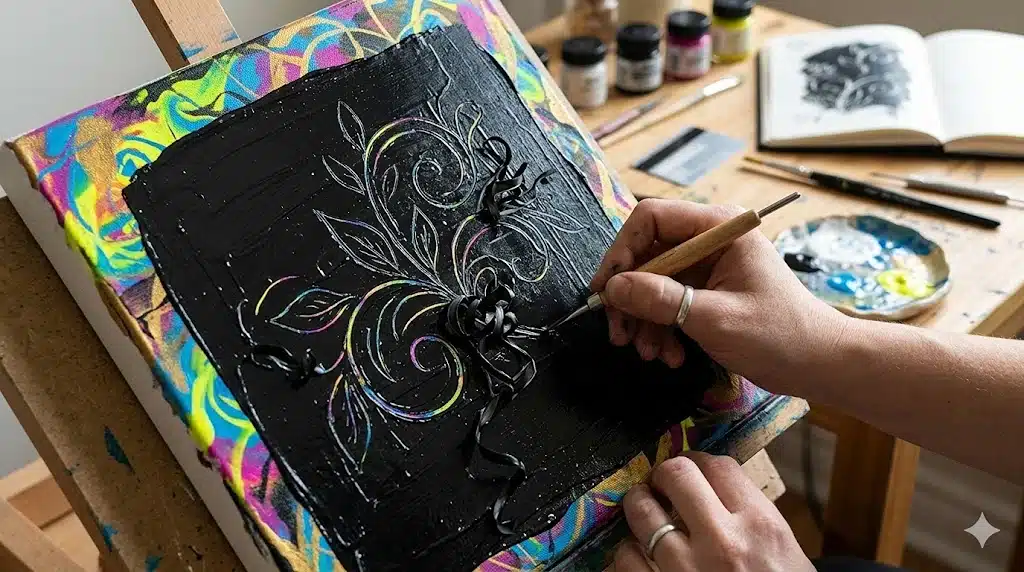
In painting, sgraffito means using a tool—anything from a palette knife to the back of a brush—to carve lines, patterns, or textures into wet or semi‑wet paint so that the color below shows through. You’re not just drawing on top; you’re cutting into the surface layer to expose what’s under it.
You’ll find sgraffito in:
Ceramics (scratching through slip or underglaze).
Architectural decoration (patterned plaster or façade designs).
Oil, acrylic, and even encaustic paintings.
Mixed media and printmaking.
This guide focuses on 2D painting: how to use sgraffito with acrylics and oils, what tools to try, and how to start with simple, confidence‑building exercises.
I. Foundations and Advantages
1. A Brief Look at Sgraffito’s Roots
While you don’t need an art‑history degree to scratch paint, a bit of context clarifies why this technique feels so alive.
Ancient ceramics: Potters applied a colored slip (liquid clay) to leather‑hard vessels, then scratched designs through the slip to reveal the clay body underneath.
Medieval and Renaissance architecture: Craftspeople built plaster layers in contrasting tones and carved patterns into the top, revealing the color beneath and creating durable decorative façades.
Modern art and design: Contemporary artists and designers use sgraffito on pottery, murals, and canvases to add both visual and tactile interest.
The constant across all these applications: contrast—between light and dark, smooth and rough, concealed and revealed. That same principle will guide your painting experiments.
2. Why Use Sgraffito in Painting?
Sgraffito gives you something a normal brushstroke can’t quite replicate: a cut or incision that feels spontaneous yet integrated into the paint film. Key benefits:
Dynamic line quality: Sgraffito lines are sharp, irregular, and often more expressive than drawn lines, because the tool digs through paint instead of riding on top.
Textural variation: Scratches catch light differently and break up flat areas, adding interest without introducing new colors.
Layer visibility: It’s an elegant way to reveal underpainting or color fields you don’t want completely covered.
Corrections and redraws: In oil especially, you can carve edges, redefine shapes, or pull back lights by scratching into darker paint.
You can use sgraffito subtly to suggest grass, hair, tree branches, or fabric weave—or boldly to carve abstract patterns into thick paint.
II. Media and Tools
1. Sgraffito in Different Media: Acrylic vs. Oil
Both acrylic and oil paints support sgraffito, but they behave differently.
4.1. Acrylic sgraffito
Acrylics dry relatively fast, which means timing is crucial. You typically scratch through a still‑wet or touch‑dry top layer to expose a fully dry underlayer. To get deeper, more dramatic scratches, you may build thicker layers with gel mediums or modeling paste. Because acrylics can be extended with mediums and are easy to layer, they’re ideal for multi-layer color reveals: bright underpainting, quieter top layers, and then scratch‑throughs that reintroduce bursts of color.
4.2. Oil sgraffito
Oils stay workable longer, so you can scratch into them hours or even days after application, depending on thickness. You can do sgraffito wet into wet (scratching into fresh paint to reveal the ground or earlier layers), or wet over dry (oil over fully dried acrylic or oil layers). The slower drying allows more controlled, gradual carving and re‑ shaping of edges. Oil sgraffito is especially helpful for defining contours, pulling out highlights, or suggesting strands of hair, grass, branches, or woven textures.
2. Tools You Can Use for Sgraffito
One of the strengths of sgraffito is that you can use almost anything that scratches without tearing the surface underneath. Common tools:
The back end of a brush (classic, always available).
Palette knives and painting knives.
Skewers, toothpicks, knitting needles.
Old credit cards, hotel room keys, or plastic scrapers.
Combs, forks, rakes, or notched scrapers for repeated patterns.
Specialized ceramics/sgraffito tools with fine metal tips (for detail).
Rubber shapers (for softer, broader marks on semi‑wet paint).
For beginners, start simple: Use the back of a brush for single lines. Use an old plastic card’s edge for longer, straight or angled scratches. Try a fork or comb to quickly suggest grass, fur, or hair. Each tool leaves a distinct mark. A good exercise is to create a “tool library” by making swatches of different sgraffito marks on scrap panels.
III. Layering and Execution
1. Layering Strategy: The Heart of Sgraffito
Sgraffito relies on contrast between top and underlying layers. You need to think in layers before you scratch.
6.1. Plan your underlayer
The underlayer should: Contrast in color or value with the top layer (light under dark, warm under cool, complementary colors, etc.). Be dry and stable if you want clean reveals (especially in acrylic). Represent something meaningful: a gradient sky, abstract color bands, or even a detailed drawing. Example combinations: Deep ultramarine under a light, warm gray top layer—scratch to get dramatic blue lines. Bright orange or magenta under muted greens—scratch to pop bits of warmth into foliage or backgrounds.
6.2. Apply the top layer
The top layer should be: Thick enough to scratch without immediately breaking down. Not too dry—still soft or at least scratchable. A color that interacts interestingly with the underlayer. In acrylic, you can mix paint with a bit of gel medium to give the top layer more body and scratchability. In oil, you can use normal painting consistency; you have longer to work.
6.3. Scratch with intention
When the top layer reaches the right stage (wet, tacky, or soft, depending on your approach): Scratch lines, patterns, or textures while controlling pressure. Vary depth: light scratching may just disturb the top layer; stronger pressure reveals more of the underlayer. Wipe your tool regularly so removed paint doesn’t smear back into the grooves. Think of it as drawing in reverse: instead of adding dark lines on a light field, you’re revealing a darker underlayer or vice versa.
2. Timing and Control: The Most Important Variable
Success in sgraffito often comes down to timing—how wet or dry the top layer is when you scratch.
Too wet: The paint may flood back into the groove, edges look mushy.
Just right: Lines remain crisp, with cleanly exposed underlayer.
Too dry: Scratching may tear the paint film unevenly or barely mark it.
In acrylic: Work in small sections so you can scratch before the paint skins over. Consider using a retarder or slow‑drying medium if you need longer open time. In oil: You have more leeway; paint remains scratchable for much longer. You can also scratch into semi‑dry paint to get softer, more distressed marks. A good practice: on a test board, apply a patch of paint and try scratching at 5, 10, 20, and 40 minutes, noting the differences.
3. Sgraffito and Mediums: Making the Surface More “Scratch-Friendly”
Mediums aren’t mandatory, but they can help tailor the paint’s behavior.
In acrylic: Gel medium thickens paint, giving more body for deeper, more dramatic scratches. Texture paste creates a hard, carvable surface once dry; you can then glaze color over it and scratch back into fresh top layers. Retarder or slow-drying medium extends the window of time during which the paint stays scratchable.
In oil: A bit more oil or medium can make paint more “buttery” and scratch‑responsive, but you don’t want it too runny. Always test small mixtures; the goal is a surface that responds nicely to your tools without collapsing or tearing.
This beginner project lets you experience the basic mechanics without worrying about complex imagery. Goal: Understand timing, contrast, and tool marks. Materials: Acrylic paints (one bright color and one muted/dark), small canvas, brush, and tools (back of brush and plastic card).
Step-by-step: Create the underlayer (bright color, let dry). Apply the top layer (muted color, not too thin). Wait a short moment (let it settle). Scratch designs with your tools. Notice how the bright underlayer pops through as you scratch. Observe and note which tools give sharp lines vs. smudged ones.
2. Project 2: Sgraffito in a Small Landscape (Acrylic or Oil)
Goal: Use scratching to describe natural textures like grass, branches, or rocks. Subject: A simple landscape. Layers: Lay in big masses for underpainting. Add a thick top layer for the field or tree masses. While workable, use a tool to pull blades of grass or bark textures. Balance: Don’t scratch everything; use sgraffito selectively to keep variety.
Goal: Build multiple color layers and reveal them. Process: First layer (bold, let dry). Second layer (different color family, leave bits of first visible, let dry). Third layer (neutral or dark on top). While wet, use different tools to scratch patterns or grids. Carve to different depths to reveal the first or second layers. This creates a rich, stratified surface where color and texture interplay.
V. Troubleshooting and Refinement
1. Common Mistakes and How to Avoid Them
Mistake 1: No contrast between layers. If they are too similar, scratches barely show. Fix: Plan high‑contrast pairs (e.g., dark blue under light yellow).
Mistake 2: Over‑scratching everything. Makes a piece feel chaotic. Fix: Reserve for focal areas or specific textures.
Mistake 3: Damaging the support. Scratching too hard on paper can gouge the surface. Fix: Practice on sturdier surfaces like primed panels or canvas.
Mistake 4: Scratching at the wrong stage. Fix: Test timing on small areas before committing.
2. Sgraffito for Drawing Lovers: Scratching Lines Instead of Ink
If you come from a drawing background, think of sgraffito as drawing by removal rather than addition. Ideas: Lay a dark top layer and scratch lighter lines to suggest contour drawings. Use sgraffito to “draw back” lost structure—defining a rim or a leaf edge. Some artists layer oil over dry acrylic and scratch linework through the oil to reveal the acrylic color beneath.
3. Sgraffito in Mixed Media and Beyond
Possibilities: Over collage (apply paint over collaged papers and scratch to reveal text). On texture paste (build texture, then glaze and scratch to accentuate ridges). Combined with pencil or pen (scratch bold structural lines, then develop details with traditional tools). You can also adopt ceramic sgraffito motifs like radial patterns or banded borders.
4. Safety and Surface Considerations
A few practical notes: Always scratch away from your supporting hand. On paper, avoid deep gouges that could tear fibers. On canvases, heavy pressure can distort the weave; consider panels for more aggressive carving. Allow adequate drying time before stacking or framing—scratched textures can catch on other surfaces if not fully cured.
5. Building Sgraffito into Your Style
Once comfortable, integrate it personally: Use it only in certain subjects like foliage or hair. Develop signature patterns like crosshatching or grids. Combine subtle and bold marks to guide the focal point. Because sgraffito reveals what is underneath, it rewards foresight: the more deliberately you plan your underlayers, the richer your scratched marks become.
Struggling to blend acrylics before they dry? Learn wet-on-wet, wet-on-dry, glazing, brush and medium choices, drying-time tricks, and step-by-step exercises for smoother blends.
1. Invisible Armor: How to Protect Your Artwork Online Through Watermarking and Copyright Control 1.1. The Hook: The Digital Mirage You upload a painting you spent weeks perfecting—a swirl of…
Learn how to write a powerful, authentic artist statement that communicates your ideas, materials, and inspiration. Practical templates, examples, and tips for clarity and confidence.
Learn how to properly seal and prime raw wood panels for acrylic and oil painting. Step‑by‑step instructions on using Golden Gloss Medium, applying gesso, sanding, and preventing yellowing and warping.
Optimize your art studio for comfort and long‑term wellness. Learn ergonomic design principles and habits to protect your back, neck, and wrists during long creative sessions.
Learn how to transform your sketches into expressive watercolor paintings. Covers planning, transferring drawings, line work, layering, and finishing techniques for artists at any level