Grinding Color by Hand: How Traditional Oil Paint Was Really Made
Art Team
June 6th, 2026
No Comments
Historical Paint Making Guide
1. Before the Tube: When Artists Made Their Own Paint
For most of oil painting’s history, there were no paint tubes, no factory-made sets, and no premixed “Titanium White” ready to squeeze. Paint was a workshop product, prepared by apprentices and assistants, or by the artists themselves.
The core process was simple in concept but demanding in practice:
Dry pigment (colored powder).
A drying oil binder (most often linseed, sometimes walnut or others).
A hard, flat surface and a stone or glass tool to grind them together.
The quality of the paint depended on everything: how pure the pigment was, how finely it was ground, how much oil was used, and how carefully it was dispersed. In other words, the “feel” and look of old master paint began long before it touched a canvas.
This article walks through that historical process: from pigment to paste, the tools used, typical ratios, and what we know from modern reconstructions.
2. Pigment and Oil: The Two Essential Ingredients
Traditional oil paint was fundamentally just pigment + drying oil.
2.1. Pigments: From earths to exotica
Pigments were insoluble powders that provided color. Historical sources include:
Earths and minerals: Ochres, siennas, umbers (iron-rich clays); Red earths and yellow earths; Azurite, malachite, lead white, vermilion.
Synthetics and processed pigments as technology progressed.
Some pigments have since become obsolete due to toxicity or stability issues.
Pigments often arrived as coarse powders or lumps and sometimes had to be further ground and levigated (washed to sort by particle size) before oil was added.
2.2. The binder: Linseed (and other) oils
The primary binder was linseed oil—the pressed oil of flax seeds. This same plant provided fibers for linen canvases. Analyses of old paintings and historical accounts show that artists also used walnut oil and, less commonly, poppy or other oils, but linseed dominated due to its drying speed and film strength.
In its simplest form, historical paint was:
Ground pigment (earth or mineral).
Just enough linseed (or similar drying oil) to bind it into a workable paste.
No resins, waxes, or dryers—those came in later recipes and varnishes.
3. The Workshop Setting: Paint Making as Teamwork
Historical sources and reconstructions show that making paint was often part of a broader studio workflow.
Apprentices and assistants prepared panels, canvases, and pigments, and ground paint. Masters focused more on design, drawing, and final layers, but many also supervised or participated in paint preparation.
A 17th-century engraving, for example, shows assistants placing red earth on a stone slab, adding linseed oil in small increments, and grinding with a stone tool. The process could be laborious, especially for pigments that were hard to wet or disperse.
Paint might be:
Ground fresh for the day’s work.
Stored in small bladders, shells, or containers for short periods.
In later centuries, kept in pig’s bladders before tubes were invented.
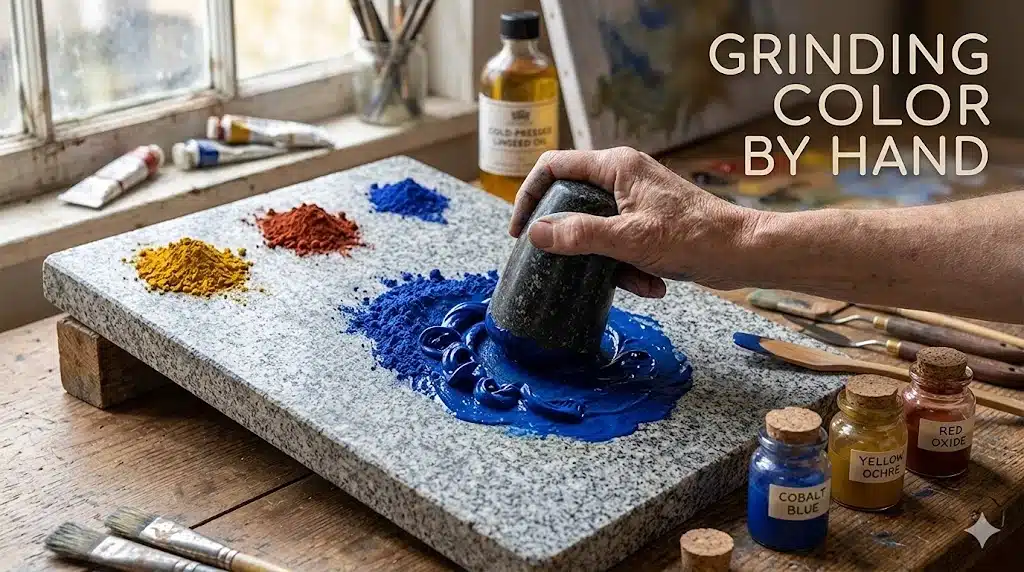
4. The Tools: Slabs, Mullers, and Knives
The essential tools for making traditional oil paint were remarkably minimal and have changed little when compared to modern hand-grinding setups.
4.1. Grinding surface (slab)
Historically:
Granite or porphyry stone slabs were common early on.
Later, glass slabs became widespread; today, frosted glass is common.
The surface had to be:
Hard and flat.
Slightly roughened (“frosted”) to provide enough friction to break down pigment agglomerates and mix them thoroughly into the oil.
Modern guides recommend preparing glass slabs and mullers by grinding silicon carbide (carborundum) into them until they look evenly frosted.
4.2. The muller
A muller is a hand-held grinding tool with a smooth, flat bottom and a handle. Historically, these were made from:
Stone (granite, porphyry).
Later glass (common today).
The muller provides shear force, pressing the pigment-oil mixture against the slab and distributing the pigment evenly through the binder.
4.3. Palette knives and spatulas
Even with a muller, palette knives or scrapers played a crucial role:
For initial mixing of pigment and oil.
For gathering and regathering the paste during grinding.
For transferring finished paint to storage.
Historical assistants likely used metal spatulas or similar tools; modern practice uses stainless steel knives.
5. Step-by-Step: Traditional Oil Paint Making
Reconstructed historical methods and modern hand-grinding instructions agree on the core process.
5.1. Step 1 – Preparing the pigment
If pigment arrived coarse or contaminated:
It might be further ground and levigated (washed in water and allowed to settle) to remove oversized particles and impurities.
After drying, the pigment was ready for oil.
For many earth pigments, simple additional grinding sufficed.
5.2. Step 2 – Forming a dry or crumbly paste
On the slab:
Place a small pile of dry pigment.
Make a well in the center and add a little linseed oil—less than you think you’ll need.
Use a palette knife to fold the pigment and oil together into a stiff, crumbly paste.
Historical sources and modern practitioners emphasize: do not start with too much oil. It is easier to add oil later than to correct an overly runny mix.
5.3. Step 3 – Mulling the mixture
Once a rough paste exists:
Place the muller on top of the paste.
Move it in circles, figure-eights, or small overlapping patterns, spreading the paste into a thin film on the slab.
Periodically stop, lift the muller, and scrape the paint back into a pile with a palette knife.
Repeat, mulling and scraping, until the paint reaches a smooth, consistent texture.
Modern guides describe a “rhythm” of mulling, scraping, and regathering, often repeating this cycle for several minutes or more depending on pigment difficulty. A video reconstruction of historical methods notes that mulling converts that stiff paste into a smooth, buttery paint, fully dispersing pigment into the oil.
5.4. Step 4 – Adjusting consistency and ratio
After initial grinding:
If the paint is too runny, more pigment can be sprinkled in and worked in with knife and muller.
If the paint is too stiff or crumbly, a drop of oil is added and worked in.
Different pigments absorb different amounts of oil. For example, one technical source suggests approximate ratios by weight such as:
Around 74% pigment / 26% linseed oil for certain cadmium yellows.
Around 67% pigment / 33% linseed oil for some ultramarine blues.
The guiding principle: add only enough oil to wet the pigment and create a paste at the desired stiffness.
5.5. Step 5 – Testing the paint
Paint-makers historically (and now) test:
Handling: Does it feel smooth and cohesive under the knife or brush?
Coverage and tinting strength: Is it strong enough or too weak?
Film quality: Does a thin test layer dry properly, without excessive separation or dullness?
If the paste passes these tests, it can be used immediately or stored.
6. Storage Before Tubes: Bladders, Shells, and Jars
Before the mid-19th century invention of the paint tube, storing oil paint was tricky.
Historical methods included:
Pig bladders: Paint was loaded into cleaned animal bladders, which could be pricked to dispense paint and then sealed with string or a pin.
Shells or small pots: Paint could be stored in small ceramic or shell containers for short periods.
Because storage was imperfect and drying slow but continuous, many artists preferred to grind paint fresh (especially certain colors), ensuring perfect consistency and minimal separation. With the advent of tubes in the 1800s, industrially ground paints could be made more consistently and preserved longer, revolutionizing studio practice.
7. Historical Variations: Oils, Resins, and “Secret” Mediums
While the basic recipe was pigment + oil, historical and early modern artists experimented with additions:
Bodied (heat-thickened) linseed oils for different drying and leveling behaviors.
Resins (like dammar or pine resins) dissolved into oil to make glossier, harder films.
Temperas and oil-tempera combinations, especially in early Netherlandish work (oil plus egg or glue in some layers).
Modern analysis of old masters suggests that, despite centuries of recipes claiming lost secrets, many great works relied on relatively simple oils and straightforward methods, while more complex mediums became common later.
8. Challenges with Different Pigments
Not all pigments grind the same way in oil.
Heavy, dense pigments (like many earths and cadmiums) often make strong, relatively straightforward pastes.
Very fine or fluffy pigments can require more careful control of oil to avoid stringy or excessively long paint.
Ultramarine blue, for instance, is noted as one of the more difficult pigments to disperse; it can get stringy or require more oil, depending on grade and oil type. Paint-makers developed experience with each pigment’s behavior, adjusting grinding time and oil proportion accordingly.
9. Why Grinding Matters More Than Just Mixing
You can mix pigment and oil roughly with a palette knife and get something that looks like paint, but proper grinding ensures:
Full wetting and dispersion: Each pigment particle is surrounded by binder.
Consistent texture: No gritty bits or unexpected lumps while painting.
Predictable drying: Uniform distribution means fewer weak spots in the film.
Modern practitioners emphasize that the muller provides the shear needed to bind pigment particles thoroughly; simply stirring may leave agglomerates partially dry inside. This is why a modest-sized muller and properly prepared slab are recommended for serious hand-made paint—even today.
10. Safety Considerations, Then and Now
Historically, many pigments (lead, arsenic-based, mercury-based) were toxic, and awareness of health risks varied. Today, anyone attempting historical methods should follow modern safety practices:
Work in a well-ventilated area.
Avoid inhaling pigment dust; wear a proper mask when handling dry pigment.
Wear gloves; avoid skin contact with toxic pigments.
Keep food and drink away from the grinding area.
Modern guides stress careful handling, especially during the dry pigment stage, which is when inhalation risk is highest.
11. Why Some Artists Still Make Their Own Paint Today
Even in an age of excellent commercial paints, some artists choose to grind their own colors. Reasons include:
Control over stiffness and oil content: You can tailor paint exactly to your preference.
Control over pigment choice: Using historical or niche pigments not commonly sold in tubes.
Consistency across a personal palette: Matching feel and behavior across colors.
Deeper understanding of materials: Experiencing firsthand how pigment and oil interact.
Some craftspeople making linseed oil paints for woodwork embrace similarly simple formulations: raw linseed oil and natural pigments, with no added synthetic binders or dryers, echoing older traditions.
12. A Modern “Historical” Workflow (Hands-On Example)
A contemporary, historically-informed workflow for making a small batch of oil paint might look like this:
Prepare tools: Frosted glass or stone slab; Glass or stone muller; Palette knife, scraper; Refined linseed oil; Pigment (e.g., yellow ochre, ultramarine).
Measure pigment: Optionally weigh pigment and oil for repeatable ratios (e.g., starting around 70–75% pigment to 25–30% oil).
Initial mixing: Pile pigment on the slab; add a small well of oil. Fold together with knife until you have a stiff paste.
Mulling: Press the muller onto the paste and move in circles, figure-eights, and small arcs. Spread the paint out thinly and work it across the slab. Periodically scrape the paint back to the center and repeat for several minutes.
Adjust: If too stiff, add a drop or two of oil and mull again. If too runny, sprinkle in more pigment and mull until smooth.
Test: Brush a small stroke on a test panel to check consistency, opacity, and flow. If satisfactory, collect the paint with a knife and store in a small jar or use immediately.
This is essentially the same process assistants in historical workshops would have followed, though their tools might have been stone rather than glass and their pigments mined or processed by hand.
13. The Role of Linseed Oil Quality
Historical and modern sources pay attention to oil quality:
Early oil extraction methods weren’t always able to separate flax seeds from weeds, so non-drying oils could contaminate linseed and slow drying.
Over centuries, painters and manufacturers experimented with refining and “bodied” oils to improve clarity, drying, and film strength.
Today, some artists enjoy the romance of refining their own cold-pressed linseed, while others note that well-made commercial refined linseed oil often provides superior, more predictable performance: less yellowing, tougher film, good wetting of finely divided pigments. In either case, the balance between pigment and oil and the thoroughness of grinding remain central to paint quality.
14. Evolution: From Simple Oil Paints to Complex Mediums
Research into old masters suggests that early oil painting often used relatively straightforward oils as binders, sometimes bodied or combined with modest resin additions. Over time:
18th–19th century manuals began to promote increasingly complex mediums—mixtures of bodied linseed oil, resins, waxes, and dryers.
Some 20th-century formulations (like those promoted by Jacques Maroger) aimed to recreate supposed “secret mediums” of the past, involving complex emulsions and resin-oil combinations.
Modern conservation work indicates that many of these complex recipes were likely not the basis of earlier masterpieces, which often relied on more direct techniques with linseed and walnut oils. Nevertheless, the “secret medium” tradition attests to how much artists valued control over drying, gloss, and handling.
15. Why Understanding Historical Paint Making Still Matters
Even if you never grind a single pigment yourself, knowing how paint was historically made can:
Help you understand why different colors behave differently out of the tube (oil absorption varies by pigment).
Deepen your appreciation of old paintings; each brushstroke is supported by careful material preparation.
Inform your choices of mediums and binders today—what you add to paint echoes centuries of experimentation.
When you open a modern tube of oil paint, you’re benefiting from the same basic chemistry and craft that assistants on stone slabs practiced hundreds of years ago, simply industrialized and standardized.
1. Invisible Armor: How to Protect Your Artwork Online Through Watermarking and Copyright Control 1.1. The Hook: The Digital Mirage You upload a painting you spent weeks perfecting—a swirl of…
Stuck in perfectionism or artist’s block? Learn how to use sandpaper, wire brushes, scraping, and distressed gesso as “surface alchemy” to reveal layers, add depth, and free up your painting…
Learn exactly how to stretch watercolor paper so it stays flat under heavy washes. Tools, soaking times, taping methods, drying tips, and common mistakes explained.
Oil Painting Curriculum: 10 Projects for Beginners 1. Getting Started: Why Projects Beat Theory Reading about color theory and brush types has value, but confidence with oils really comes from…
Learn how to write a powerful, authentic artist statement that communicates your ideas, materials, and inspiration. Practical templates, examples, and tips for clarity and confidence.
Confused by acrylic mediums? Learn what gels, fluids, retarders, and other additives actually do, how brands differ, and which ones are genuinely useful for your painting style.
Struggling with portraits that look “off”? Learn the core proportions of the human face—eyes, nose, mouth, ears—and how to place them accurately using simple thirds and fifths for more realistic…